Friday, August 12, 2011

Adding a Crease to Paper in Photoshop

With my new degree program came the tools and training to make some fantastic graphics. And though I'm well versed in how to use the software I've found an endless font of tips and tricks to create great new effects. Add to that an old nerd hobby of mine, Dungeons and Dragons, and you suddenly get a new way to add life to a game that traditionally takes place, for the most part, only in the player's imagination.

In my quest to make some nice looking maps I came across a youtube video series on fantasy cartography that provided a great repertoire for building maps with simple techniques and a minimal amount of artistic ability.

There are almost 20 videos in the series, but past video 7 or so the techniques get very particular to town or city type maps. At the time, I wanted to build an overland map, so around video 7 or 8 was where I stopped picking up useful tricks (until, of course, I decide my campaign needs a city map!). In the end I came up with quite a nice looking map of the northlands in my campaign:


Everything on the map (except the font) was made by hand using techniques from the videos linked above. The fold lines in the paper, however, were an extra touch I wanted to add to make it look better as a player handout.

Initially I tried scanning a folded piece of paper, but the effect just didn't feel right. In the end, this is how I ended up creating them:

1) Add a hole in the paper using the technique used to create the frayed edge of the paper. As an added touch it helps to use the burn tool with a low exposure to darken the area surrounding the hole.


2) Make a rectangular selection with the upper side passing through the end of the hole as shown.


3) Fill the selection with any color on a new layer. I used white, but it's not really important what color you use as we won't see it at all.


4) Turn the fill of this new layer down to 0%. In effect, this causes any pizels in the layer to be invisible, but the layer itself is still visible since we haven't turned down the opacity.


5) Dounble click the layer (not the layer name or thumbnail), or click the FX button on the bottom of the layer pallete and click Blending Options. Use the following settings:


6) To make the vertical crease duplicate the layer by dragging the layer to the new layer button on the bottom of the layers palette or right click the layer, click Duplicate Layer, then OK. Then, with the duplicate layer selected, open the Edit Menu, and go to Transform -> Rotate 90 degrees CW.

Use the move tool to position it properly. To position a second fold where you want it keep this layer selected and hit Command+T or Control+T to enter free transform mode and drag the handle on the side until the folds of the paper are where you like them.

7) As a finishing touch, take the smudge tool and set the strength to around 30-40%. Make sure you have a soft brush by clicking the dropdown for brush selection and turn the hardness to 0%.

Then, on the two fold layers star using the smudge tool in a perpendicular motion to the fold you're working with. If you have holes in the paper, this will help smooth the glow out of the holes. If you don't have folds it will soften the corners in the paper fold and make it look more worn.


You can use this technique for all shapes and kinds of folds. In the map above I made a circular fold at the bottom by painting in the shape with a hard brush and the same layer styles.

Friday, August 5, 2011

Overhaul

It's been a long time since I posted and it's long since time for an overhaul. Some obvious changes have been made including a facelift and address change. The less noticeable change is that of format.

Instead of trying to maintain a blog about a specific game or a specific avenue of play I'm refocusing this into a more personal blog. The refocus will include all avenues of my life from gaming to web design to my soon-to-be-expanding family.

Becoming more of a journal, this blog will become place I can vent and channel a portion of the creative energy I have and provide a record of some portion of myself.

Topics I'm likely to post on:

- World of Warcraft
- The Old Republic
- Console Games
- Photoshop
- Web Design
- Movies
- And anything else I feel passionate about!

To whom it may concern - enjoy.

Wednesday, November 10, 2010

The New Guild Interface

Patch 4.0.1 brought about many interface changes. Among the most notable, the guild window has had a complete revamp and now integrates some useful tools to the framework that can be easily overlooked.

Reorganization

The old two tab guild window has been reorganized with a drop down menu containing four separate categories. The old format of player location and guild rank have been placed into each of their respective drop down items: Player Status and Guild Status; both of which remain largely unchanged.

Though this new dropdown approach is not quite as fast as tabbing between the two panels in the old guild window, it's a necessary evil as a couple new features have been added to the guild window that allow for more information at a glance.

If you're looking for the old "show offline" option, it's moved to the bottom of the frame, and works with each of the four tabs.

Achievements

One of the two new tabs in the guild window is the achievements tab, which lists each player's total achievement points and their rank in the guild. Every wonder who plays the game way too much? You can probably find out in this tab!

Any Jewelcrafters Online???

Without a doubt the most useful tab in the new guild window is the tradeskill tab, a tool that has largely flown under the radar with the release of 4.0.1.

The new tab allows you to view not only a list of all guild members and their tradeskills, but clicking on a player will bring up that player's tradeskill window complete with all recipes that player knows.

This tool will take much of the hassle out of finding a crafter in the guild for whatever reason. Instead of asking constantly in guild who can craft the new belt or leggings recipe, or who can cut a strength/hit gem, players can simply head to the tradeskill tab in the guild window and find a crafter themselves.

Guild Information

The Guild Information box has been upgraded from it's own button, to it's own page on the guild window. Located on the bottom of the window, this tab now contains much more than a simple text box for random guild information.

The guild message of the day and guild information box (where ventrillo or teamspeak information is often stored) now reside here alongside a dedicated box for guild events set up through the calendar. This will allow players in guild that use the in game event calendar to see a quick list of upcoming events without clicking through all the dates in the calendar, giving a handy birds-eye view of upcoming activities.

Tuesday, October 12, 2010

Grouping 101: Target Priority

The coming Cataclysm is a time for many things. While many will only be concerned with making sure their AddOns get updated, the impending expansion is also a great time to reassess your goals for the game. It's also a great time to get back to basics and reaffirm many of the in-game skills that separate the pro players from the noobs.

In the process or bringing a Mage character to maximum level before Deathwing bursts forth from the deep places of Azeroth, I've become acutely aware of just how lazy the end game can make some players. In light of these experiences I'm taking things back to basics with a review of target priority.

Skull, Then X....

Burn that into your brain, because it's been the go-to kill order for players across servers since the targeting icons were added to the game.

Raid and group leaders mark targets for a reason. That reason being that focusing fire on priority targets is often crucial to success. If it's not crucial to success it's usually helpful in optimizing kill order to minimize the drain on group resources.

Wrath of the Lich King has made players lazy in the resource management department. While DPS casters will likely not have too many issues, healers will need to pay much closer attention to their mana pools to be effective. This is where efficiency will become important. Put less strain on the healers pull by pull, and the instance will run much smoother overall.

Target Priority

Unfortunately, pulls aren't always marked. A group mate may accidentally pull the next group or adds may intervene mid fight. Even though a pull may not be marked, it is still good practice to have a clearly defined kill order in order to focus DPS on priority targets.

A decent rule of thumb is to kill any caster mobs first, as they tend to be the healers and spell damage casters, often bringing other disastrous abilities to the mix that must be dealt with to ensure your party survives. In addition, tanks are built primarily to take physical hits and typically must pop cooldowns or rely on high health levels to effectively mitigate caster damage, so hunter, rogue and warrior enemies traditionally can be left for last.

Crowd Control

With Cataclysm instances will put a greater emphasis on crowd control spells, boasting more dangerous enemies that must be pacified during a fight to avoid destroying a group outright.

It's important for classes to know what crowd control spells they can use as many of these abilities only affect certain types of creatures. This means that a groups composition may radically change the list of enemies that can be controlled.

Here is a list of all the primary (easily renewable) crowd control types:

Humanoids: Mage (Polymorph), Shaman (Hex), Paladin (Repentance), Warlock (Succubus' Seduction)
Beasts: Mage (Polymorph), Shaman (Hex), Druid (Hibernate)
Elementals: Warlock (Banish), Shaman (Bind Elemental)
Demons: Warlock (Banish, Enslave Demon), Paladin (Repentance)
Undead: Priest (Shackle Undead), Paladin (Repentance)
Dragonkin: Druid (Hibernate), Paladin (Repentance)
Giant: Paladin (Repentance)
All types: Hunter (Freezing Trap)

There are also some secondary crowd control effects. I list them as secondary for multiple reasons. Some are not renewable due to long cooldowns or DoTs applied after their duration applied. Others are not truly crowd control as they leave the target free to cast or, in the case of fears, send the creature careening away in a random direction potentially pulling other groups by proximity aggro.

Here is a list of secondary crowd control effects:

Mage: Frost Nova
Priest: Mind Control (Humanoids), Psychic Scream
Rogue: Sap (Humanoids, Beasts, Demons and Dragonkin), Blind
Druid: Cyclone, Entangling Roots
Paladin: Turn Evil (Undead and Demons)
Hunter: Wyvern Sting (Survival only)
Warlock: Fear
Death Knight: Chains of Ice

It can be helpful for players using crowd control abilities to focus their crowd control target or use an AddOn to monitor the duration left on the crowd controlled target. Since many targets are crowd controlled because they pose a particular danger to the group, monitoring the duration left on a crowd control apell can mean the difference between keeping a target under control or letting it massacre a healer.

Tuesday, September 14, 2010

Indianapolis MMORPG Examiner

I know this blog continues to be somewhat barren, but I fully intend to continue posting just as soon as there is something worth posting about. I tend to want to make posts of substance that inform players about aspects or systems of gameplay that may not be obvious like my raiding 101 entries and AddOn tutorials.

Being that this is the end of an expansion and everyone is in something of a holding pattern there really isn't a whole lot to post about as many topics could potentially fall flat when the new expansion releases and gameplay is turned on it's head.

In the meantime, if you enjoy my writing head on over to the Examiner.com where I've been recently handed to title of MMORPG examiner for the city of Indianapolis. And please do send me feedback on the kinds of postings you'd like to see on this blog and my Examiner page.

You can reach me for feedback at the following e-mail address: scottstadt@yahoo.com.

I look forward to hearing from you!

Saturday, August 14, 2010

Cataclysm and Elemental: Part 1

First of all no, I'm not dead. As tends to happen from time to time life circumstances made things hectic for a while and posting to the blog took a back seat. Hopefully things will continue to settle and I'll continue to be able to post.

I recently obtained an invite to the Cataclysm Beta from Wowinterface.com. Since I'm an author there I was able to register fora beta key tracking ID and was soon thereafter bequeathed an invite to the Cataclysm Beta. So I thought I'd take some time to go over the changes to date with Elemental.

Spells and Abilities

The primary rotation hasn't changed, we just have more tools to work with on the move.

This spell changes depending on what your weapon is imbued with. For elemental, this should (still) always be Flametongue Weapon. And for those purposes this spell is an instant cast small fire nuke that buffs your next fire spell's damage by 20%.

This is a great little on the move blast of fire that gives us a little more edge to our movement periods. Spiritwalker's Grace (which is not available yet as the level cap is currently 83) will help even more so, but given that it's slated for a long cooldown it can't be relied on heavily. This adds a wonderful little button to press while on the move to buff the next Lava Burst, which becomes a larger percentage of overall damage done during heavy movement fights.

Unleash Elements will also make a great round-off to a rotation where Lava Burst will come off too fast for another lightning bolt. It will probably be optimal to save this ability for a Lava Bust regardless since the extra 20% damage will definitely be best applied there.

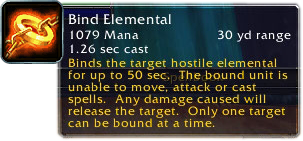
This is a fairly dull ability in my opinion. I'm not saying we can't use more crowd control, but coming up with another keybinding for a situational ability gave me a headache. I'm just hoping that we'll have plenty of excuses to use it since this purports to be an elemental-heavy expansion.

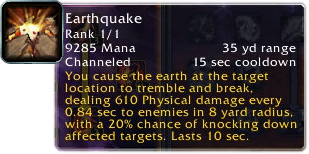
Earthquake is fun and sexy. The graphic is pretty rough still, but the damage it does is not too shabby. The only downside is that it's physical but if you pair it up with a magma and earthbind totem you can wreck a group of enemies pretty well.

A cooldown prevents you from spamming it, but in the 5 second window you'll find a few GCDs to reapply totems and fire nova before earthquaking again. You have to make sure and ghost wolf a good distance away when employing this strategy as one or two mobs sometimes seep through and chunk down at your channeling if they aren't knocked down so proper placement of totems and earthquake are essential to pulling this off.
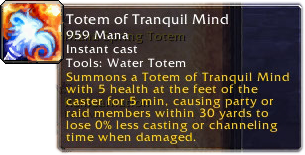
Speaking of chunking down on casting times, a new tool we have to combat this nefarious act is a new water totem. In the most recent beta build Blizzard decided we were the class that would get the previously Paladin only Concentration Aura buff.

The tooltip in game currently reads 0%, but this is probably a tooltip error only as deploying the totem does appear to significantly reduce pushback on casting time. I'd imagine the actual percentage is comparable to the Paladin version.

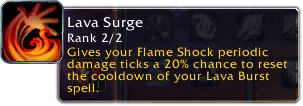
In keeping with Enhancement's 20% chance at concentrated coolness we now have a talented 20% chance to reset the cooldown on Lava Burst each time Flame Shock ticks periodic damage. This talent has led me to write my Lava Burst into a macro as such:

#showtooltip
/stopcasting
/cast Lava Burst

Before making this simple macro I suffered from jittery movement spikes and clunky keybindings in an attempt to stay on top of Lava Burst. As the proc is from the Flame Shock DoT component the proc can happen at any time during the rotation and often in the middle of a lightning bolt cast. The above macro helps to ease the quick transition from one spell to your refreshed Lava Burst.

One nice side effect that I hopefully won't get to used to before I start upgrading my gear after release is the interaction between Lava Surge and the tier 10 set bonus. With the DoT extension component I'm able to easily keep Flame Shock up indefinitely on a training dummy. In fact doing this is so effortless that I don't expect to be casting more than one Flame Shock per boss fight once 4.0 hits.

Though I suspect this will change once Cataclysm gear starts outstripping Icecrown loot. At my current gear level (about 50/50 split between 264 and 277 pieces) I've only upgraded a few off-set pieces like boots and bracers. I suspect level 85 dungeons and heroics will change that, stripping off the tier 10 anomaly quickly.

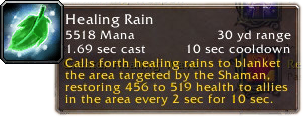
Though not an Elemental spell, this is trainable by all specs and as such it will probably be a good tool or Elemental as well to help with some spot healing.

It acts like a mobile, more powerful Healing Stream Totem, and the mana cost is manageable for Elemental, especially given how mana is even less of an issue than it has been in the past at this point in the beta.

The area of effect is actually quite large so for any fight where parts of the raid clump up in one area this will be a great tool to alleviate some pressure on overtaxed healers.

Rotation

There are two major things that will modify the rotation for Cataclysm: Unleash Elements and Lava Surge.

Lava Surge being the heaviest element of change, it will add a little bit of unpredictability to the rotation. Since it can pop at any time it will become paramount to maintain a Flame Shock debuff at all times, so when Lava Surge procs you won't have to spend an entire GCD sitting on an active Lava Burst while reapplying your DoT.

Unleash Elements can be looked at in two different ways; a good rotation round out or an on-cooldown nuke and Lava Burst buff. Finishing out a rotation smoothly to get out a Lava Burst on cooldown is important to maximizing Elemental DPS, but Lava Surge adds an element of unpredictability to Lava Burst's cooldown. The proc doesn't happen during every single Lava Burst cooldown, but often enough that rounding out the rotation may become less of an issue.

As I haven't tested the dungeons extensively yet it's hard to predict much more about how the gameplay will evolve during beta. At the moment the level cap is 83 so the full picture is still out of focus slightly.

Monday, June 21, 2010

PowerAuras: Linking Auras

So hopefully by now you, dear reader, have discovered the wonders of the AddOn PowerAuras. This wonderful little mod has an incredible array of usefulness from buff and debuff tracking to cooldown, health and mana monitoring. If you aren't familiar with the basic setup you can check out my other entry on the subject, PowerAuras: The Best AddOn You've Never Used! for a quick rundown.

As I mentioned above, this incredibly versatile mod can help you out with a lot of tedious or hard to monitor UI elements, but each aura can only track one thing in one way at one time. The mod works like binary, meaning an aura can only be on or off... there's no in between. But what if you want an aura to display under a slightly more complicated set of conditions?

For instance, you may hear from a member of the Hunter class from time to time how clunky Aspect of the Viper is as a mana regeneration mechanic. Often a player will go through several pulls or even entire boss fights not realizing Viper has been left on long past it's usefulness! Unfortunately the only thing PowerAuras will be able to tell you with a single aura is whether the buff is on or not on. It won't tell you when your mana is full and Viper is still on - at least not with one aura!

This kind of complexity can be achieved, however, by linking multiple auras together. Think of each aura as a single condition. In the case of the Hunter's example above there would be a single condition for Aspect of the Viper being on and another condition for your mana level being at or above a certain threshold. By linking these two conditions together you can effectively use a single texture to display only when both of these conditions are met i.e. "Display my aura when Aspect of the Viper is on and my mana is above 90%".

I recently started DPSing on my Death Knight whom I specced into unholy some time ago. One of the more unintuitive aspects of unholy DPS is Bone Shield. The spell provides an increase to DPS while it's up, but can fade with damage and has a cooldown. A single aura to track this spell is impractical as the buff may have dropped, but the spell may still be on cooldown. This is another situation where linked auras can come in handy.

Linking Auras

First you'll want to set up an aura like normal. Pick a texture and color, then place and scale it to preference. For this example our first aura will be for activated by the buff Bone Shield.

Since I want to know when the buff is not active the invert checkbox is ticked and this aura is for my second spec so I've unchecked spec 1 down at the bottom of the page.

Next we'll close this aura and return to the main window. Click the copy button and then the character specific page currently highlighted on the top left to paste this aura into the same area. Now that you've copied the aura shift click the original to disable it(More on why we do this later). It's also helpful at this point to make note of the number in brackets in the tooltip for this disabled aura. For my own setup this number is 8.

Now open the newly copied aura (the one that wasn't disabled) so we can change the settings to match up to our second condition. For this example the second condition will be activated by My Spell Cooldown with the activating spell being Bone Shield once again. Make sure to uncheck the Invert box for this aura.

Now comes the part where we link the two auras.

You'll notice in the image to the left there is a highlighted text box. This box is unlabeled in the aura configuration, however on mouseover the tooltip will explain that this box is used to link the aura for multiple conditions.

This is where we'll enter the number of the aura we wish to link it to, in my case the aura number is 8.

That's it!

Now, earlier on we disabled the original aura. We do this because otherwise both auras would be displayed simultaneously. Since we copied the aura in the first place they'd be identical and the aura would simply appear less transparent as it's been doubled up. Disabling the first aura will prevent this from happening. Since the second aura is linked to the first it will not be displayed unless the conditions for both auras have been met.