The coming Cataclysm is a time for many things. While many will only be concerned with making sure their AddOns get updated, the impending expansion is also a great time to reassess your goals for the game. It's also a great time to get back to basics and reaffirm many of the in-game skills that separate the pro players from the noobs.
In the process or bringing a Mage character to maximum level before Deathwing bursts forth from the deep places of Azeroth, I've become acutely aware of just how lazy the end game can make some players. In light of these experiences I'm taking things back to basics with a review of target priority.
Skull, Then X....
Burn that into your brain, because it's been the go-to kill order for players across servers since the targeting icons were added to the game.
Raid and group leaders mark targets for a reason. That reason being that focusing fire on priority targets is often crucial to success. If it's not crucial to success it's usually helpful in optimizing kill order to minimize the drain on group resources.
Wrath of the Lich King has made players lazy in the resource management department. While DPS casters will likely not have too many issues, healers will need to pay much closer attention to their mana pools to be effective. This is where efficiency will become important. Put less strain on the healers pull by pull, and the instance will run much smoother overall.
Target Priority
Unfortunately, pulls aren't always marked. A group mate may accidentally pull the next group or adds may intervene mid fight. Even though a pull may not be marked, it is still good practice to have a clearly defined kill order in order to focus DPS on priority targets.
A decent rule of thumb is to kill any caster mobs first, as they tend to be the healers and spell damage casters, often bringing other disastrous abilities to the mix that must be dealt with to ensure your party survives. In addition, tanks are built primarily to take physical hits and typically must pop cooldowns or rely on high health levels to effectively mitigate caster damage, so hunter, rogue and warrior enemies traditionally can be left for last.
Crowd Control
With Cataclysm instances will put a greater emphasis on crowd control spells, boasting more dangerous enemies that must be pacified during a fight to avoid destroying a group outright.
It's important for classes to know what crowd control spells they can use as many of these abilities only affect certain types of creatures. This means that a groups composition may radically change the list of enemies that can be controlled.
Here is a list of all the primary (easily renewable) crowd control types:
Humanoids: Mage (Polymorph), Shaman (Hex), Paladin (Repentance), Warlock (Succubus' Seduction)
Beasts: Mage (Polymorph), Shaman (Hex), Druid (Hibernate)
Elementals: Warlock (Banish), Shaman (Bind Elemental)
Demons: Warlock (Banish, Enslave Demon), Paladin (Repentance)
Undead: Priest (Shackle Undead), Paladin (Repentance)
Dragonkin: Druid (Hibernate), Paladin (Repentance)
Giant: Paladin (Repentance)
All types: Hunter (Freezing Trap)
There are also some secondary crowd control effects. I list them as secondary for multiple reasons. Some are not renewable due to long cooldowns or DoTs applied after their duration applied. Others are not truly crowd control as they leave the target free to cast or, in the case of fears, send the creature careening away in a random direction potentially pulling other groups by proximity aggro.
Here is a list of secondary crowd control effects:
Mage: Frost Nova
Priest: Mind Control (Humanoids), Psychic Scream
Rogue: Sap (Humanoids, Beasts, Demons and Dragonkin), Blind
Druid: Cyclone, Entangling Roots
Paladin: Turn Evil (Undead and Demons)
Hunter: Wyvern Sting (Survival only)
Warlock: Fear
Death Knight: Chains of Ice
It can be helpful for players using crowd control abilities to focus their crowd control target or use an AddOn to monitor the duration left on the crowd controlled target. Since many targets are crowd controlled because they pose a particular danger to the group, monitoring the duration left on a crowd control apell can mean the difference between keeping a target under control or letting it massacre a healer.
Tuesday, October 12, 2010
Tuesday, September 14, 2010
Indianapolis MMORPG Examiner
I know this blog continues to be somewhat barren, but I fully intend to continue posting just as soon as there is something worth posting about. I tend to want to make posts of substance that inform players about aspects or systems of gameplay that may not be obvious like my raiding 101 entries and AddOn tutorials.
Being that this is the end of an expansion and everyone is in something of a holding pattern there really isn't a whole lot to post about as many topics could potentially fall flat when the new expansion releases and gameplay is turned on it's head.
In the meantime, if you enjoy my writing head on over to the Examiner.com where I've been recently handed to title of MMORPG examiner for the city of Indianapolis. And please do send me feedback on the kinds of postings you'd like to see on this blog and my Examiner page.
You can reach me for feedback at the following e-mail address: scottstadt@yahoo.com.
I look forward to hearing from you!
Saturday, August 14, 2010
Cataclysm and Elemental: Part 1
First of all no, I'm not dead. As tends to happen from time to time life circumstances made things hectic for a while and posting to the blog took a back seat. Hopefully things will continue to settle and I'll continue to be able to post.
I recently obtained an invite to the Cataclysm Beta from Wowinterface.com. Since I'm an author there I was able to register fora beta key tracking ID and was soon thereafter bequeathed an invite to the Cataclysm Beta. So I thought I'd take some time to go over the changes to date with Elemental.
Spells and Abilities
The primary rotation hasn't changed, we just have more tools to work with on the move.
 This spell changes depending on what your weapon is imbued with. For elemental, this should (still) always be Flametongue Weapon. And for those purposes this spell is an instant cast small fire nuke that buffs your next fire spell's damage by 20%.
This is a great little on the move blast of fire that gives us a little more edge to our movement periods. Spiritwalker's Grace (which is not available yet as the level cap is currently 83) will help even more so, but given that it's slated for a long cooldown it can't be relied on heavily. This adds a wonderful little button to press while on the move to buff the next Lava Burst, which becomes a larger percentage of overall damage done during heavy movement fights.
Unleash Elements will also make a great round-off to a rotation where Lava Burst will come off too fast for another lightning bolt. It will probably be optimal to save this ability for a Lava Bust regardless since the extra 20% damage will definitely be best applied there.
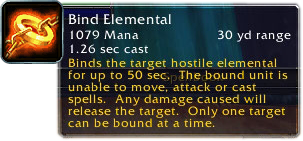 This is a fairly dull ability in my opinion. I'm not saying we can't use more crowd control, but coming up with another keybinding for a situational ability gave me a headache. I'm just hoping that we'll have plenty of excuses to use it since this purports to be an elemental-heavy expansion.
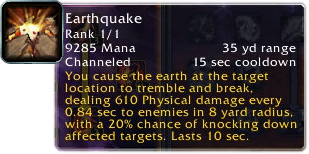 Earthquake is fun and sexy. The graphic is pretty rough still, but the damage it does is not too shabby. The only downside is that it's physical but if you pair it up with a magma and earthbind totem you can wreck a group of enemies pretty well.
A cooldown prevents you from spamming it, but in the 5 second window you'll find a few GCDs to reapply totems and fire nova before earthquaking again. You have to make sure and ghost wolf a good distance away when employing this strategy as one or two mobs sometimes seep through and chunk down at your channeling if they aren't knocked down so proper placement of totems and earthquake are essential to pulling this off.
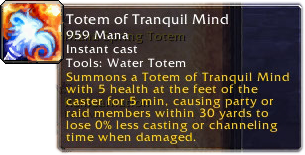 Speaking of chunking down on casting times, a new tool we have to combat this nefarious act is a new water totem. In the most recent beta build Blizzard decided we were the class that would get the previously Paladin only Concentration Aura buff.
The tooltip in game currently reads 0%, but this is probably a tooltip error only as deploying the totem does appear to significantly reduce pushback on casting time. I'd imagine the actual percentage is comparable to the Paladin version.
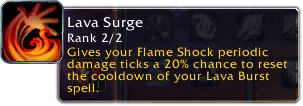 In keeping with Enhancement's 20% chance at concentrated coolness we now have a talented 20% chance to reset the cooldown on Lava Burst each time Flame Shock ticks periodic damage. This talent has led me to write my Lava Burst into a macro as such:
#showtooltip
/stopcasting
/cast Lava Burst
Before making this simple macro I suffered from jittery movement spikes and clunky keybindings in an attempt to stay on top of Lava Burst. As the proc is from the Flame Shock DoT component the proc can happen at any time during the rotation and often in the middle of a lightning bolt cast. The above macro helps to ease the quick transition from one spell to your refreshed Lava Burst.
One nice side effect that I hopefully won't get to used to before I start upgrading my gear after release is the interaction between Lava Surge and the tier 10 set bonus. With the DoT extension component I'm able to easily keep Flame Shock up indefinitely on a training dummy. In fact doing this is so effortless that I don't expect to be casting more than one Flame Shock per boss fight once 4.0 hits.
Though I suspect this will change once Cataclysm gear starts outstripping Icecrown loot. At my current gear level (about 50/50 split between 264 and 277 pieces) I've only upgraded a few off-set pieces like boots and bracers. I suspect level 85 dungeons and heroics will change that, stripping off the tier 10 anomaly quickly.
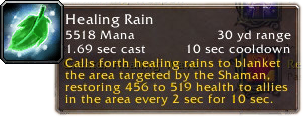 Though not an Elemental spell, this is trainable by all specs and as such it will probably be a good tool or Elemental as well to help with some spot healing.
It acts like a mobile, more powerful Healing Stream Totem, and the mana cost is manageable for Elemental, especially given how mana is even less of an issue than it has been in the past at this point in the beta.
The area of effect is actually quite large so for any fight where parts of the raid clump up in one area this will be a great tool to alleviate some pressure on overtaxed healers.
Rotation
There are two major things that will modify the rotation for Cataclysm: Unleash Elements and Lava Surge.
Lava Surge being the heaviest element of change, it will add a little bit of unpredictability to the rotation. Since it can pop at any time it will become paramount to maintain a Flame Shock debuff at all times, so when Lava Surge procs you won't have to spend an entire GCD sitting on an active Lava Burst while reapplying your DoT.
Unleash Elements can be looked at in two different ways; a good rotation round out or an on-cooldown nuke and Lava Burst buff. Finishing out a rotation smoothly to get out a Lava Burst on cooldown is important to maximizing Elemental DPS, but Lava Surge adds an element of unpredictability to Lava Burst's cooldown. The proc doesn't happen during every single Lava Burst cooldown, but often enough that rounding out the rotation may become less of an issue.
As I haven't tested the dungeons extensively yet it's hard to predict much more about how the gameplay will evolve during beta. At the moment the level cap is 83 so the full picture is still out of focus slightly.
Monday, June 21, 2010
PowerAuras: Linking Auras
So hopefully by now you, dear reader, have discovered the wonders of the AddOn PowerAuras. This wonderful little mod has an incredible array of usefulness from buff and debuff tracking to cooldown, health and mana monitoring. If you aren't familiar with the basic setup you can check out my other entry on the subject, PowerAuras: The Best AddOn You've Never Used! for a quick rundown.
As I mentioned above, this incredibly versatile mod can help you out with a lot of tedious or hard to monitor UI elements, but each aura can only track one thing in one way at one time. The mod works like binary, meaning an aura can only be on or off... there's no in between. But what if you want an aura to display under a slightly more complicated set of conditions?
For instance, you may hear from a member of the Hunter class from time to time how clunky Aspect of the Viper is as a mana regeneration mechanic. Often a player will go through several pulls or even entire boss fights not realizing Viper has been left on long past it's usefulness! Unfortunately the only thing PowerAuras will be able to tell you with a single aura is whether the buff is on or not on. It won't tell you when your mana is full and Viper is still on - at least not with one aura!
This kind of complexity can be achieved, however, by linking multiple auras together. Think of each aura as a single condition. In the case of the Hunter's example above there would be a single condition for Aspect of the Viper being on and another condition for your mana level being at or above a certain threshold. By linking these two conditions together you can effectively use a single texture to display only when both of these conditions are met i.e. "Display my aura when Aspect of the Viper is on and my mana is above 90%".
 I recently started DPSing on my Death Knight whom I specced into unholy some time ago. One of the more unintuitive aspects of unholy DPS is Bone Shield. The spell provides an increase to DPS while it's up, but can fade with damage and has a cooldown. A single aura to track this spell is impractical as the buff may have dropped, but the spell may still be on cooldown. This is another situation where linked auras can come in handy.
Linking Auras
 First you'll want to set up an aura like normal. Pick a texture and color, then place and scale it to preference. For this example our first aura will be for activated by the buff Bone Shield.
Since I want to know when the buff is not active the invert checkbox is ticked and this aura is for my second spec so I've unchecked spec 1 down at the bottom of the page.
Next we'll close this aura and return to the main window. Click the copy button and then the character specific page currently highlighted on the top left to paste this aura into the same area. Now that you've copied the aura shift click the original to disable it(More on why we do this later). It's also helpful at this point to make note of the number in brackets in the tooltip for this disabled aura. For my own setup this number is 8.
Now open the newly copied aura (the one that wasn't disabled) so we can change the settings to match up to our second condition. For this example the second condition will be activated by My Spell Cooldown with the activating spell being Bone Shield once again. Make sure to uncheck the Invert box for this aura.
 Now comes the part where we link the two auras.
You'll notice in the image to the left there is a highlighted text box. This box is unlabeled in the aura configuration, however on mouseover the tooltip will explain that this box is used to link the aura for multiple conditions.
This is where we'll enter the number of the aura we wish to link it to, in my case the aura number is 8.
That's it!
Now, earlier on we disabled the original aura. We do this because otherwise both auras would be displayed simultaneously. Since we copied the aura in the first place they'd be identical and the aura would simply appear less transparent as it's been doubled up. Disabling the first aura will prevent this from happening. Since the second aura is linked to the first it will not be displayed unless the conditions for both auras have been met.
Saturday, June 12, 2010
Oobie's AddOn Roundup
I thought I'd take a break from my typical rants and raves about raiding etiquette and strategy to toot my own horn for a bit.
If you recall far enough back in my blogging career you may remember a post entitled Hello World: Your First AddOn. I decided not to follow up on that particular topic because, well, programming is not or everyone and isn't near as widely useful as much of the raiding topics that I tend to post on this blog. For me personally, I do enjoy the occasional visitation to the land of computer logic!
I am by no means an expert programmer, but I do know my way around basic computer logic and I've found many ways to apply that knowledge to AddOn authoring in WoW. My mods tend to be very lightweight and simplistic... but they do the job and do it well. And they do it without all the overhead added by all the bells and whistles of many more popular mods that perform the same task.
ChannelManager
ChannelManager is my most recent AddOn, being published for the first time the same day as this blog entry... and takes care of a very simple yet, in my opinion, highly valuable task. I tend to write mods that automate certain things that slip by under the radar and this mod is a perfect example of such.
What it does, simply put, is ensure that you are always in the channels you designate you want to be in. I don't know how many times my channels have mysteriously disappeared silently and I've only found out halfway through a raid when I've already missed some important discussion in a healing or tanking channel. The aim of this mod is to make sure this situation never happens again by automatically rejoining any channels you've lost.
LDB_AnkhTimer
Formerly known as StatBlock_AnkhTimer, this is an LDB plugin that displays your Ankh count (if you aren't glyphed to remove the reagent cost) and the time left until Reincarnation finishes it's cooldown.
BlueButtons
Truth be told, BlueButtons is not even really an AddOn.
In point of fact BlueButtons is a skin for the default interface. Meaning instead of code being run in game the files in BlueButtons overwrite the files used by the default interface to change the appearance of the red interface buttons to a Wrath of the Lich King themed blue.
Readiness
Readiness was born in a time when the ready check sound was a very quiet drum sound effect. What it does is provide an interface for you to choose a custom sound file to play for ready checks.
The mod comes loaded with a host of custom sounds, more of which can be added by modifying the config section in the mods lua file.
WoWGate
WoWGate has no configuration and works right out of the box. What it does is play a sound effect when a mage in your group or raid opens a portal. The sound effect also plays when a Death Gate opens if you are a Death Knight.
OobieUI
Last, but certainly not least is my complete UI, ready for download by any interested party!
I can't claim each and every mod in this compilation is mind - not by a long shot - but many of them have been modified to work slightly differently than they do out of the box in keeping with how I've set my UI up to work.
Many of the mods come ready to use as much of my interface's configuration is done in the actual lua files, but most mods that aren't have a profile names Oobiedoo - Ysera that can be enabled to import my settings.
Sunday, May 30, 2010
Healing Tools: Grid
The duty of a DPS is rather simple all things considered. Granted, there are some not-so-obvious hallmarks of a good DPS but the level of complexity that I went into in the blog entry linked above shows where the truly great players can really shine. Beyond these intricacies, all a DPS really has to do is repeat a spell rotation or skill priority to maximize damage done.
 Now compare that baseline role to that of a healer and a very different schema comes to light. The baseline job of a healer is to keep the raid alive. Granted, there are many instances where folks not standing in fire or ignoring fight mechanics can make that expectation impossible to meet, but assuming your raid group is performing well, there is somewhat of a hidden level to "keeping the raid alive".
The classic game of whack-a-mole has evolved within Blizzard's encounter design over the years from Molten Core where often healers would either be assigned to heal their group or a tank to nowadays where pretty much everybody has to contribute to raid and tank healing to ensure success.
The Hidden Layer
 So what is it that separates the true healers from the..... combat medics? I mean aside from using the venom from a single alien creature to take care of pretty much every virus, infection and tick infestation the far side of the universe can offer....
Damage comes in, and heals go out, we all know this. The truly skilled healers know when damage is about to come in and react accordingly with shield, HoTs or priming* their heals.
Much unlike DPS, healing is not an all or none game. When you want DPS on a target you want as much as possible as fast as possible. When you want healing you want it fast... but you don't want too much. Extra heals not only mean wasted mana, but they could potentially cause a death in the raid if a healer is focusing on the wrong target to heal at the wrong time.
I Give You... Grid!
 Grid is by no means a new mod. Personally, I've been using it since back during The Burning Crusade when it was the mod for raid healing. Nowadays folks have Healbot and Vuhdo that come loaded with tons of extra features all rolled into one. For this raider, however, a combination of Grid and Clique are all you need.
It comes with all the normal bells and whistles that healers need: fading out of range targets, pre-configured cleansing indicators, aggro indicators, class coloring... and with the addition of Clique healing spells can be bound to your mouse clicks for ease of casting in combat.
Why Grid?
What I like about grid over other raid frame windows is the custom indicator setup. Each part of the raid frame has an indicator that can be loaded up with all kinds of buff and debuff indicators, which can be prioritized in the event two indicators are active at the same time.
Pair this up with the ability to add a custom buff or debuff and all of a sudden a wide array of boss encounter information is being displayed right on your raid frame and you know, for instance, which 3 people in your grid window have been linked by Pact of the Darkfallen during the Blood Queen encounter.
 In the example above I've set my Grid frame borders to display the three pact targets as a pink color. And whenever I see this during the encounter I know to start slinging chain heals on these three targets as they'll be running right up to each other, making my job much simpler.
Some other examples of excellent buffs/debuff monitoring in Icecrown Citadel are: "Frost Beacon" during Sindragosa, "Harvest Soul" during the Lich King and "Bone Spike" for heroic Lord Marrowgar (The Bone Spikes don't deal damage during the encounter on normal mode so it's not necessary to track them). In terms of buffs I've found it extremely helpful to add the buff "Essence of the Blood Queen" while I'm DPSing as it makes it much easier to identify raid members that can still be bitten during the fight.
Of course, there are other examples as these are just a few. When researching a new boss fight if you notice any debuffs that deal large amounts of damage to the target it may be a good idea to add an indicator to Grid to assist in healing the right target at the right time.
Configuration
"But Oobie," you say. "How do I set this up? The Grid menu is so confusing!"
Don't worry! I've taken care of everything...
 First, open the Grid configuration window by clicking the minimap/Fubar/LDB button depending on which setup you use. Or if you're like me and prefer to keep all that crap off the screen the following command will open the menu:
/grid config
Once that's open scroll down and click on the Auras heading. You'll see a couple boxes where you can input a custom buff or debuff name. For this example, we'll add the Pact of the Darkfallen buff to the border of the health frame as depicted in the image earlier in this entry.
Type "Pact of the Darkfallen" into the debuff text box and hit enter.
 Once this is done, expand the Auras heading and you should be able to find the new entry labeled Debuffs: Pact of the Darkfallen. Here you'll be able to set the color for the debuff and it's priority. Don't be concerned if the color is white regardless of what you choose with the color picker. The proper color will be reflected in the raid window when the indicator becomes active.

Once you've selected a color look up near the top of the config menu and expand the Frame heading and select Border just beneath it. Then scroll through the list of buffs and debuffs and place a check mark next to our new Pact of the Darkfallen debuff. NOTE: All of the items under the Frame heading behave similarly. I've found the best results using borders and corner indicators for debuff monitoring.

That's it! The new indicator is now set up, and this will work for all custom auras. Just make sure you add new items properly as buffs or debuffs as Blizzard tends to use both in their encounter design.
*"Priming" a heal is the practice of casting a healing spell before damage has actually been done to a target. This is done typically when damage is known to be incoming on that target so that the heal lands just after the damage comes in. Often when this is done a player will monitor the healing spell cast time and cancel it if it will be wasted.
 Now compare that baseline role to that of a healer and a very different schema comes to light. The baseline job of a healer is to keep the raid alive. Granted, there are many instances where folks not standing in fire or ignoring fight mechanics can make that expectation impossible to meet, but assuming your raid group is performing well, there is somewhat of a hidden level to "keeping the raid alive".
The classic game of whack-a-mole has evolved within Blizzard's encounter design over the years from Molten Core where often healers would either be assigned to heal their group or a tank to nowadays where pretty much everybody has to contribute to raid and tank healing to ensure success.
The Hidden Layer
 So what is it that separates the true healers from the..... combat medics? I mean aside from using the venom from a single alien creature to take care of pretty much every virus, infection and tick infestation the far side of the universe can offer....
Damage comes in, and heals go out, we all know this. The truly skilled healers know when damage is about to come in and react accordingly with shield, HoTs or priming* their heals.
Much unlike DPS, healing is not an all or none game. When you want DPS on a target you want as much as possible as fast as possible. When you want healing you want it fast... but you don't want too much. Extra heals not only mean wasted mana, but they could potentially cause a death in the raid if a healer is focusing on the wrong target to heal at the wrong time.
I Give You... Grid!
 Grid is by no means a new mod. Personally, I've been using it since back during The Burning Crusade when it was the mod for raid healing. Nowadays folks have Healbot and Vuhdo that come loaded with tons of extra features all rolled into one. For this raider, however, a combination of Grid and Clique are all you need.
It comes with all the normal bells and whistles that healers need: fading out of range targets, pre-configured cleansing indicators, aggro indicators, class coloring... and with the addition of Clique healing spells can be bound to your mouse clicks for ease of casting in combat.
Why Grid?
What I like about grid over other raid frame windows is the custom indicator setup. Each part of the raid frame has an indicator that can be loaded up with all kinds of buff and debuff indicators, which can be prioritized in the event two indicators are active at the same time.
Pair this up with the ability to add a custom buff or debuff and all of a sudden a wide array of boss encounter information is being displayed right on your raid frame and you know, for instance, which 3 people in your grid window have been linked by Pact of the Darkfallen during the Blood Queen encounter.
 In the example above I've set my Grid frame borders to display the three pact targets as a pink color. And whenever I see this during the encounter I know to start slinging chain heals on these three targets as they'll be running right up to each other, making my job much simpler.
Some other examples of excellent buffs/debuff monitoring in Icecrown Citadel are: "Frost Beacon" during Sindragosa, "Harvest Soul" during the Lich King and "Bone Spike" for heroic Lord Marrowgar (The Bone Spikes don't deal damage during the encounter on normal mode so it's not necessary to track them). In terms of buffs I've found it extremely helpful to add the buff "Essence of the Blood Queen" while I'm DPSing as it makes it much easier to identify raid members that can still be bitten during the fight.
Of course, there are other examples as these are just a few. When researching a new boss fight if you notice any debuffs that deal large amounts of damage to the target it may be a good idea to add an indicator to Grid to assist in healing the right target at the right time.
Configuration
"But Oobie," you say. "How do I set this up? The Grid menu is so confusing!"
Don't worry! I've taken care of everything...
 First, open the Grid configuration window by clicking the minimap/Fubar/LDB button depending on which setup you use. Or if you're like me and prefer to keep all that crap off the screen the following command will open the menu:
/grid config
Once that's open scroll down and click on the Auras heading. You'll see a couple boxes where you can input a custom buff or debuff name. For this example, we'll add the Pact of the Darkfallen buff to the border of the health frame as depicted in the image earlier in this entry.
Type "Pact of the Darkfallen" into the debuff text box and hit enter.
 Once this is done, expand the Auras heading and you should be able to find the new entry labeled Debuffs: Pact of the Darkfallen. Here you'll be able to set the color for the debuff and it's priority. Don't be concerned if the color is white regardless of what you choose with the color picker. The proper color will be reflected in the raid window when the indicator becomes active.
Once you've selected a color look up near the top of the config menu and expand the Frame heading and select Border just beneath it. Then scroll through the list of buffs and debuffs and place a check mark next to our new Pact of the Darkfallen debuff. NOTE: All of the items under the Frame heading behave similarly. I've found the best results using borders and corner indicators for debuff monitoring.

That's it! The new indicator is now set up, and this will work for all custom auras. Just make sure you add new items properly as buffs or debuffs as Blizzard tends to use both in their encounter design.
*"Priming" a heal is the practice of casting a healing spell before damage has actually been done to a target. This is done typically when damage is known to be incoming on that target so that the heal lands just after the damage comes in. Often when this is done a player will monitor the healing spell cast time and cancel it if it will be wasted.
Thursday, April 29, 2010
Raiding 101: ZOMG Phat Lewt!
So you're fighting a new boss in ICC and wipe after wipe after wipe things seem to be getting nowhere. Then, from out of nowhere the fight comes together in a beautiful crescendo of fire avoidance, positioning and target priority... and with a thud the boss' grill hits the floor.
 Congratulations, now it's time to loot! But does the boss drop anything you want? If he drops something you can use, will you need any other gear pieces to fit it into your set? Are there other players who will also be interested in this hypothetical item?
If you don't know the answers to these questions when the loot windows pop up, you probably should.
Best in Slot (BiS)
There is a lot of talk amongst the WoW community of items that are called best in slot. While it is typically beneficial for players to find a list of their BiS gear, what's BiS for one player may not be for another. This can be true even when comparing players of an identical class and spec in some situations.
True, there is a ceiling where items can be considered BiS for the entirety of a particular class and spec, but when you're talking about an individual person you have to be a little more flexible in your definition of BiS.
For the purposes of this blog entry, what we'll consider BiS is defined by the following parameters:
 Balancing stat caps properly while inflating other non-cappable stats to the maximum achievable should be the goal in assembling a BiS list. For those with multiple stats to cap it can be even more important to plan ahead to avoid situations where you pick up an spectacular piece of gear only to lug it around in your bags until you can make up the lost defense or expertise.
Here is a list of cappable stats and their caps:
This is important to the overall health of the raid because of how loot is dispersed to the raid. For instance, if a spellcasting neck drops and a caster with loot priority in the guild decides it's an upgrade over what they currently have they may take it. But in the grand scheme of things if there is a better item out there for that person that drops the next raid week that first item is going to be turned into a shard or vendored instead of being put to use by another raider.
Guild Progression Level
This is the factor that makes cookie cutter BiS lists less than optimal for those who are not yet fully progressed through a raid zone, or guilds who only run 10 main instances (although the 10-man 25-man distinction will vanish come Cataclysm).
The research necessary may seem daunting at first... I know I don't want to sift through all those wowhead pages! However, the folks over at mmo-champion.com have this nifty page that will show you an overview of gear from all of ICC that's easily referenced.
To assist in the compilation of a BiS list I recommend a spreadsheet. You can use the Microsoft Office suite if you have it available, but for broke folks like myself there are free alternatives, the easiest of which to set up is google docs. If you'd prefer software for your computer over a spreadsheet embedded in the browser Open Office is a free office suite that's compatible with Microsoft Office.
Setting up... The List!
Set up columns for slot name, item type (this will help later in organizing items), item name, each of your class and spec specific stats and each color of gem. You can see my full example spreadsheet here.
 Under the slot name column you'll need 16 row names: Head, Neck, Shoulders, Back, Chest, Wrist, Gloves, Waist, Legs, Feet, Ring, Ring2, Trinket, Trinket2, Main-Hand, Off-Hand.
just below the Off-Hand row, beneath each stat column heading set the box to add up the sum of all the rows above it. to do this, click in the box and type the following (assuming the first column is column D): =sum(D2:D17)
For each column adjust the letter of what you type to the column you're typing in, so for instance, type the following into the box beneath the item rows for column J: =sum(J2:J16)
Once that's all done you're ready to start importing items. When I did my BiS list I simply imported every item off the 10-man heroic list and 25-man normal list because those are the items I would potentially have access to at my guild's current progression level. Use the Item Type column to list what kind of item it is, that was you can simply move this item's boxes up and line them up with the appropriate row.
 Trinkets can be a difficult prospect for someone in a guild not fully progressed through 25 man content because often community discussion focuses solely on the best available from 25 man content. Thumbing through threads in your class forum on elitistjerks.com can often shed some light on which trinkets are best for your situation.
Once you're all done and satisfied with your list you can be prepared for loot drops during a raid. With this information at hand you can identify whether a particular item is going to be very useful or simply a short term upgrade. This is especially true for classes with multiple caps to juggle like tanks as it can be helpful to hang onto a wide array of gear in case you need to make up for lost stats when you pick up an exceptional new upgrade that, as a side effect, drops you below the expertise, or worse yet... defense cap.
There's nothing wrong with taking an intermediary item if it's better than what you have, but for those pieces that are not in your BiS list consider passing to another player, especially one who is under geared. After all, items do more good for your raid as a whole on another player than they do collecting dust in your bank.
 Congratulations, now it's time to loot! But does the boss drop anything you want? If he drops something you can use, will you need any other gear pieces to fit it into your set? Are there other players who will also be interested in this hypothetical item?
If you don't know the answers to these questions when the loot windows pop up, you probably should.
Best in Slot (BiS)
There is a lot of talk amongst the WoW community of items that are called best in slot. While it is typically beneficial for players to find a list of their BiS gear, what's BiS for one player may not be for another. This can be true even when comparing players of an identical class and spec in some situations.
True, there is a ceiling where items can be considered BiS for the entirety of a particular class and spec, but when you're talking about an individual person you have to be a little more flexible in your definition of BiS.
For the purposes of this blog entry, what we'll consider BiS is defined by the following parameters:
- Class and Spec
- Statistic Hard and Soft Caps
- Guild Progressions Level
 Balancing stat caps properly while inflating other non-cappable stats to the maximum achievable should be the goal in assembling a BiS list. For those with multiple stats to cap it can be even more important to plan ahead to avoid situations where you pick up an spectacular piece of gear only to lug it around in your bags until you can make up the lost defense or expertise.
Here is a list of cappable stats and their caps:
- Defense: 540
- Expertise softcap: 26
- Spellcasting Hit: 17% (14% with boomkin/sp debuff)
- Melee 1h/shield, 2h & yellow dmg Hit: 8%
- Haste rating softcap: 50%
This is important to the overall health of the raid because of how loot is dispersed to the raid. For instance, if a spellcasting neck drops and a caster with loot priority in the guild decides it's an upgrade over what they currently have they may take it. But in the grand scheme of things if there is a better item out there for that person that drops the next raid week that first item is going to be turned into a shard or vendored instead of being put to use by another raider.
Guild Progression Level
This is the factor that makes cookie cutter BiS lists less than optimal for those who are not yet fully progressed through a raid zone, or guilds who only run 10 main instances (although the 10-man 25-man distinction will vanish come Cataclysm).
The research necessary may seem daunting at first... I know I don't want to sift through all those wowhead pages! However, the folks over at mmo-champion.com have this nifty page that will show you an overview of gear from all of ICC that's easily referenced.
To assist in the compilation of a BiS list I recommend a spreadsheet. You can use the Microsoft Office suite if you have it available, but for broke folks like myself there are free alternatives, the easiest of which to set up is google docs. If you'd prefer software for your computer over a spreadsheet embedded in the browser Open Office is a free office suite that's compatible with Microsoft Office.
Setting up... The List!
Set up columns for slot name, item type (this will help later in organizing items), item name, each of your class and spec specific stats and each color of gem. You can see my full example spreadsheet here.
 Under the slot name column you'll need 16 row names: Head, Neck, Shoulders, Back, Chest, Wrist, Gloves, Waist, Legs, Feet, Ring, Ring2, Trinket, Trinket2, Main-Hand, Off-Hand.
just below the Off-Hand row, beneath each stat column heading set the box to add up the sum of all the rows above it. to do this, click in the box and type the following (assuming the first column is column D): =sum(D2:D17)
For each column adjust the letter of what you type to the column you're typing in, so for instance, type the following into the box beneath the item rows for column J: =sum(J2:J16)
Once that's all done you're ready to start importing items. When I did my BiS list I simply imported every item off the 10-man heroic list and 25-man normal list because those are the items I would potentially have access to at my guild's current progression level. Use the Item Type column to list what kind of item it is, that was you can simply move this item's boxes up and line them up with the appropriate row.
 Trinkets can be a difficult prospect for someone in a guild not fully progressed through 25 man content because often community discussion focuses solely on the best available from 25 man content. Thumbing through threads in your class forum on elitistjerks.com can often shed some light on which trinkets are best for your situation.
Once you're all done and satisfied with your list you can be prepared for loot drops during a raid. With this information at hand you can identify whether a particular item is going to be very useful or simply a short term upgrade. This is especially true for classes with multiple caps to juggle like tanks as it can be helpful to hang onto a wide array of gear in case you need to make up for lost stats when you pick up an exceptional new upgrade that, as a side effect, drops you below the expertise, or worse yet... defense cap.
There's nothing wrong with taking an intermediary item if it's better than what you have, but for those pieces that are not in your BiS list consider passing to another player, especially one who is under geared. After all, items do more good for your raid as a whole on another player than they do collecting dust in your bank.
Subscribe to:
Posts (Atom)


